
Sometimes the simplest things hold the key.
Perhaps what may be holding back your in photography isn’t a piece of gear or a new Lightroom preset but a refresher on the elements of exposure. If you’re like many others it may be a gap in your understanding of the fundamentals. I get asked all kinds of questions about what gear ‘is best.’ Before I attempt to answer, I ask: “What problem are you trying to solve?”
While it’s not always the case, often enough what’s lacking is a bit of understanding. Something hasn’t quite clicked (pun intended) in the way that cameras work and how they record light. In other cases an ugly myth or misconception has crept in and is causing confusion – I’m looking at you, ISO.
Many times the person already has the equipment to achieve what they want and what was missing was a bit of information or understanding.
I have broken down the basic elements of exposure and explained each of them in a way that I hope will improve your understanding. Perhaps it will fill in some gaps in your knowledge, dispel some myths, or reinforce what you already know.
As always, I appreciate your feedback.
Exposure:
Exposure in photography is determined by how much light reaches the sensor (or film) and affects the brightness or darkness of the image. Exposure is a balancing act achieved through a combination of shutter speed and aperture, and can also be aided by ISO.
Cameras have a fixed dynamic range. This means there is a limit to the brightness and darkness that can be captured before the camera records pure white or black. The typical dynamic range of a professional digital camera is between 12-15 stops and varies by sensor manufacturer, generation, and physical size among other factors.
A photo is said to be ‘over exposed’ when important details are lost due to excessive brightness. It is said to be ‘under exposed’ when important details are lost due to not being bright enough. When highlights are lost to pure white or shadows to pure black, ‘clipping’ is said to have occurred. Unfortunately, data in clipped areas is lost. There is no way to restore details in areas that have been clipped.
Exposure is measured in ‘stops.’ Before understanding the elements of exposure it’s essential to be clear on what exactly a ‘stop’ is.
Definition of a Stop:
A “stop” in photography refers to a doubling or halving of the amount of light that makes up an exposure. A one-stop increase in exposure means doubling the amount of light. A one-stop decrease in exposure reduces light by half.
The light meters built into most cameras use the stop as the unit of measure. They typically range from -2 to +2 covering a 4 stop range. 0 is at the center of the meter and denotes the amount of light recommended by the camera to create a ‘proper exposure,’ however this is based on a neutral subject and does not fully take into account the scene nor the creative intent of the photographer. More on ‘proper exposure’ below.
Now that we know what a stop is, let’s move on to the settings.
Shutter Speed:
We begin exploring the elements of exposure with the shutter speed. The shutter speed controls how long the camera’s sensor (or film) is exposed to light. The duration of the shutter speed affects exposure and is crucial for managing motion:
Most shutter speed durations last less than one second and are therefore expressed as fractions of a second. Some camera displays omit the numerator (which is always 1), and show only the whole-number denominator when expressing shutter speed.
For example, a displayed shutter speed of 200 is actually 1/200th of a second, 400 means 1/400th, 50 is 1/50th and so on.
Shutter speeds lasting more than one second are often denoted with quotes: 1” = 1 second. 1”3 = 1 ⅓ seconds. 8” = 8 seconds.
A shutter speed of 15 = 1/15th of a second, meanwhile 15” means 15 seconds.
Slower shutter speeds leave the sensor exposed for a longer period of time. Thus results in an increase of exposure and the image appears brighter. Conversely, faster shutter speeds leave the sensor exposed for shorter periods of time. The result of this is a decrease in exposure and the image appears darker.
Shutter Speeds and Motion
Faster shutter speeds progressively freeze motion, while slower shutter speeds record more motion. Slow shutter speeds can capture motion blur if subjects move during the exposure or the camera isn’t stabilized.
Determining what shutter speed is best for a given scenario depends on several factors starting with creative decisions regarding the desired level of exposure and whether the intent is to capture a perfectly still subject or motion blur.
Intuitively, faster moving subjects require faster shutter speeds in order to appear ‘frozen’ while perfectly still subjects can use a much slower shutter speed, yet at extremely slow speeds motion blur can still occur due to camera shake.
*It is important to know that controlling motion is also affected by the focal length of the lens – longer focal lengths require faster shutter speeds in order to ‘freeze’ motion.
Using a slower shutter speed for a desired effect is known as “dragging the shutter.”
Whenever you double or half the shutter speed, you have changed the exposure by one stop.
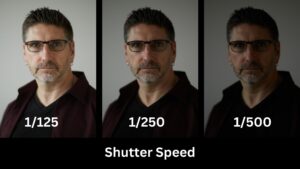
Example
A shutter speed of 1/50 allows one stop more light than a shutter speed of 1/100.
1/500 is one stop less light than 1/250.
1/250 is one stop less light than 1/125.
1/125 is two stops (four times) more light than 1/500.
There was a time when it was typical for cameras to only allow you to change shutter speed in 1-stop increments (doubling or halving the duration), however most modern cameras allow for finer control. It is now common to be able to adjust the shutter speed in ⅓-stop increments. This means it takes three steps in either direction to affect the exposure by one stop: three steps faster will reduce the light by one stop, and three steps slower will increase the exposure by one stop.
1/50 to 1/60 is ⅓ stop faster.
1/50 to 1/80 is ⅔ stop faster.
1/50 to 1/100 is one stop faster.
Aperture:
The aperture setting controls the size of the lens opening during exposure.
The relative size of this opening affects both exposure and depth of field.
Like shutter speeds, aperture values are also expressed in fraction form, however instead of the numerator being 1, it is represented by the variable f which stands for “focal length,” referring to the focal length of the lens. Because of this, convention is to refer to aperture values as “f stops.”
Similar to how shutter speeds are often presented, camera displays may omit the numerator and show only the denominator to represent the aperture value. For example: 5.6 instead of f/5.6.
Doubling the aperture size allows for twice the light to reach the sensor in a given period of time and results one one stop more exposure. Likewise, halving the aperture size allows only half the light to reach the sensor in a given time period, resulting in one stop less exposure. You may recognize the similarity between shutter speed’s effect on exposure, and this is by design.
The difference is, however, that the numbers used to represent aperture size are not as obvious to recognize as doubles or halves as it is with shutter speed.
Aperture Values
Whole f-stop sequence looks like:
f/1 – f/1.4 – f/2 – f/2.8 – f/4 – f/5.6 – f/8 – f/11 – f/16 – f/32
The ‘strange’ numeric values used to express aperture are derived from calculating the area of the opening which is based on the area of a circle. If you recall from geometry class, the formula for the area of a circle is πr2. The aperture number however refers to the relative diameter.
It’s helpful to know that the geometric sequence of numbers corresponds to the powers of the square root of 2. You can read more about it on Wikipedia here: https://en.wikipedia.org/wiki/F-number
In practice just bear in mind that lower f numbers indicate wider apertures allowing more light to pass through, while higher f numbers indicate smaller apertures allowing less light to pass through.
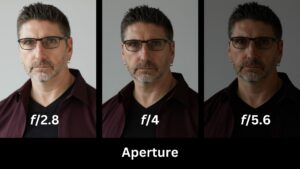
Example
In the same way f/4 is a bigger aperture than f/8, and f/5.6 is smaller than f/2.8.
This is easier to understand if we substitute 100mm for f.
100/4 = 25 which is larger than 100/8=12.5.
100/5.6= 17.85 is smaller than 100/2.8=35.71.
Like shutter speed, most modern cameras allow aperture to be adjusted in ⅓ steps
f/4 to f/4.5 is ⅓ stop smaller.
f/4 to f/5 is ⅔ stop smaller.
f/4 to f/5.6 is one stop smaller.
Aperture and Depth of Field
Depth of field (DoF) is defined as the range of distance within a photo that appears acceptably sharp. It determines how much of the foreground, middle ground, and background are in focus.
Lower f-stops which you know increase exposure also reduce depth of field.
Higher f-stops which you know decrease exposure also increase depth of field.
Depth of field is not only affected by the f-stop, but also by the focal length of the lens and the focal distance. Shallow depth of field is often used to separate the subject from the foreground and background.
To see how each variable affects depth of field, plug some numbers into a depth of field calculator. I often use this one: https://www.photopills.com/calculators/dof
Determining the best f-stop for a given scenario can be a matter of practicality or of creative discretion.
ISO and Its Role in Exposure:
Contrary to common belief, ISO does not change the sensor’s sensitivity to light. This claim is an inaccurate adaptation of the ISO given to film. ISO adjusts the gain or amplification of the signal after the light has been captured by the sensor.
This means:
Low ISO settings (e.g., 100 or 200) produce the least amount of signal amplification, resulting in cleaner images with minimal noise and the widest dynamic range.
Increasing ISO increases the signal amplification making the image appear brighter, but also amplifies noise and reduces dynamic range which can degrade image quality.
Understanding the application of ISO in combination with shutter speed and aperture adjustments is crucial for achieving desired exposure levels while maintaining image quality. This understanding allows photographers to make informed decisions based on the shooting environment and artistic goals.
MYTH ALERT:
Adjusting the camera’s ISO in no way changes the ‘sensitivity of the sensor.’ I have seen that stated and written in many places around the web, but it simply is not true. The sensitivity of the sensors is NOT adjustable. In fact, it may be more accurate to say that raising the ISO reduces the sensitivity, in the sense that by amplifying the signal it raises the bottom end of the dynamic range but not the top, thereby reducing it.
Simple 3 Step Method for Determining Exposure Settings
To apply the elements of exposure you your photography requires a careful balance. To simplify, I will share a method of my own.
1: First, I start with an ISO of 100. Low ISO gives me the cleanest signal and makes the entire dynamic range of my camera available.
2: Next I choose my aperture value. This is based on the depth of field I feel best suits my vision of the scene.
3: Finally I determine the slowest shutter speed I can get away with using without capturing motion blur or camera shake.
If hand-holding the camera I use the 1/focal length rule of thumb which says that in order to avoid motion blur, the shutter speed should be at least 1/focal length or faster. For example, if I’m using a 50mm lens that means my shutter speed should not go below 1/50s. If I’m using my 85mm, the nearest shutter speed would be 1/100s. If I’m using my 70-200 lens, I’ll need to keep my shutter speed at 1/200s or faster. With my initial aperture and shutter speed set, I test the exposure by engaging the camera’s built-in meter or by taking a test shot.
If the image is too bright, I increase the shutter speed until I achieve the exposure I want.
However if the image is too dark using my original settings I have to either compromise on the aperture and open it wider (if possible) and/or increase the ISO until the exposure I want is achieved.